2017.07.16=7
To program an ATMEGA328P it is necessary to have:
1 A PC. For this blog, a desktop PC running Windows 7 is used.
2 Internet access to download the software, etc.
3 A suitable IDE to write the program. The IAR Embedded Workbench for Atmel AVR is used.
4 The ATMEGA328P microcontroller. This can be purchased online for about US$ 1.52, free shipping.
5 A programmer. The USBASP can be purchased online for about US$ 1.65, free shipping.
6 A breadboard, some common electronic components, and connectors, or equivalent.
7 A piece of SN74HC164N would be used for the SPI.
8 A multimeter would be useful. The colour codes on some resistors are really hard to read.
The so-called "Terms and Conditions" apply:
1 The "free shipping" may take about a month.
2 Knowledge in C language is assumed.
3 Installing the driver for the USBASP may be troublesome.
4 The USBASP is to be used with the AVRDUDE software in DOS commands.
5 A breadboard is used, although wire-wrapping would be better. The wrapping tool and wrapping wires are expensive.
For the IAR IDE, USBASP and AVRDUDE , please see
https://programmingmicrocontrollerskohcs.blogspot.sg/2017/07/atmega16.html
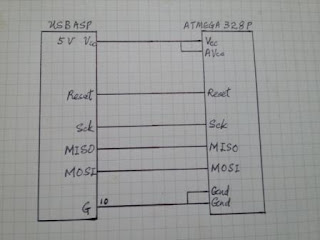
To test the USBASP on the ATMEGA328P, some connections have to be made.
0 Download and read the ATMEGA328P datasheet.
What are the differences between ATMEGA328P and ATMEGA328 ? ...
1 The multimeter may be useful in identifying the pin numbers.
2 For 'Ground', pin 3 on the USBASP does not seem to work. Pin 10 was used.
3 The 5-V setting was used. The 3.3-V setting seems to have some problem.
4 On the ATMEGA328P, the pull-up resistor for the reset pin was omitted.
5 The usual 0.1 uF capacitor was also omitted.
6 Check the circuit by avrdude -c usbasp -p m328p
The "cannot set sck period" warning may be ignored.
Programming:
1 Select or create a suitable folder, one suitable for the avrdude DOS commands.
2 Launch the workbench.
3 Create a new project, an empty project in the folder, such as P3.
4 In Project Options | General Options, select ATMEGA328P processor as the target.
5 In Project Options | Linker | Output, select 'Other' Format. Either Motorola or Intel will work.
6 Create, name and add a new C file to the project.
Just this line will do: void main(void){}
7 Project | Rebuild All to produce an output file such as P3.a90. These are the start-up codes.
8 Download this file to the ATMEGA328P by
avrdude -c usbasp -p m328p -U flash:w:debug\exe\P3.a90
The file has to be copied to the appropriate folder or the path has to be complete.
9 The Command Prompt screen should display the downloading process.
There are many possible errors.
This will be moved and continued after ATMEGA16 is done.


No comments:
Post a Comment